Play With Container Network Interface
A docker container may need more than one network interfaces (virtual or physical NICs). In this post, we will show how to create OVS internal ports and veth paris, and assign them to containers as vNICs.
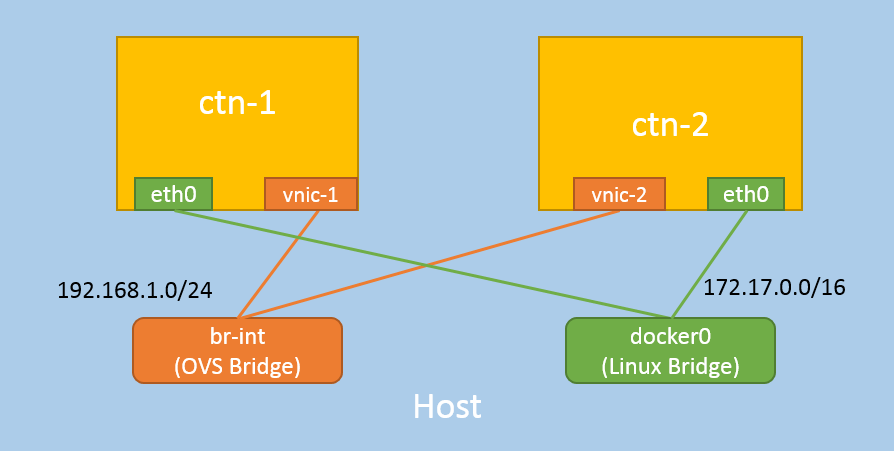
A preview of the network topology:
1 Preliminary Knowledge
Following preliminary network knowledge is needed to understand this article. If aleady familar with these, jump to Section 2 directly.
1.1 Linux Network Namespace (netns)
Linux supports network namespaces [1,5], each host has a default netns,
named default, and each container on the host is isolated to it’s own netns.
Check the non-default network namespaces on our host:
$ ip netns list # or ip netns, ip netns ls
Empty!
1.2 Container Netns
Start a container with default network configurations, here we use linux alpine for
convenience:
$ docker pull alpine:3.5
$ docker run -d --name ctn-1 library/alpine:3.5 sleep 3600d
$ docker ps
CONTAINER ID     IMAGE                 COMMAND        CREATED        STATUS        PORTS   NAMES
dc2572d49035     library/alpine:3.5    "sleep 360d"   3 seconds ago  Up 1 seconds          ctn-1

$ ip netns list
Namespaces list is still empty! This is because docker hides container namespaces by default. let’s expose them manually:
$ sudo docker inspect -f '{{.State.Pid}}' ctn-1
44356

$ ln -s /proc/44356/ns/net /var/run/netns/44356
$ ip netns list
44356
Yes, that’s our container’s network namespace, represented by an positive number.
1.3 Play with Netns
Check the container’s network interfaces:
$ ip netns exec 44356 ifconfig
eth0      Link encap:Ethernet  HWaddr 02:42:AC:11:00:05
          inet addr:172.17.0.5  Bcast:0.0.0.0  Mask:255.255.0.0

lo        Link encap:Local Loopback
          inet addr:127.0.0.1  Mask:255.0.0.0
This is equivalent to:
$ docker exec -it ctn-1 sh

/ # ifconfig
eth0      Link encap:Ethernet  HWaddr 02:42:AC:11:00:05
          inet addr:172.17.0.5  Bcast:0.0.0.0  Mask:255.255.0.0

lo        Link encap:Local Loopback
          inet addr:127.0.0.1  Mask:255.0.0.0
By definition, each network namespace has its own route tables and arp tables. Check with:
$ ip netns exec <NETNS> route -n
$ ip netns exec <NETNS> arp -n
Network devices, either physical or virtual, could be moved between network namespaces:
$ ip link set <DEV> netns <NETNS>
1.4 Virtual Network Devices
You should have a basic understanding of OVS, veth pair, tap/tun devices.
Some of my previous posts also covered these topics [3].
2 Add New NIC To Container
In this section, we will launch two containers, create an OVS internal port for each, and assign each of them to a container as additional NICs.
For simplicity, we wrapped several commands into tiny scripts. The scripts utilize the tools mentioned in Sction 1, with additional error handling code. You could get the scripts in Appendix.
2.1 Launch Containers
$ docker run -d --name ctn-1 library/alpine:3.5 sleep 3600d
$ docker run -d --name ctn-2 library/alpine:3.5 sleep 3600d
2.2 Expose Network Namespace
$ ./expose-netns.sh ctn-1
$ ./expose-netns.sh ctn-2

$ ip netns list
45091 (id: 19)
44356 (id: 18)
2.3 Create OVS Port, Assign to Container
$ ./add-nic.sh ctn-1 vnic-1 br-int
$ ./add-nic.sh ctn-2 vnic-2 br-int
We will see that vnic-1 has been added to ctn-1 as a NIC:
$ ip netns exec 44356 ifconfig
eth0: flags=4163<UP,BROADCAST,RUNNING,MULTICAST>  mtu 1500

lo: flags=73<UP,LOOPBACK,RUNNING>  mtu 65536

vnic-1: flags=4163<UP,BROADCAST,RUNNING,MULTICAST>  mtu 1500
        inet6 fe80::8c93:43ff:fe3b:5971  prefixlen 64  scopeid 0x20<link>
So does vnic-2 to ctn-2.
3 Test
3.1 Functionality Test
To test the connectivity, we configure the containers with private IP addresses:
$ ip netns exec 44356 ifconfig vnic-1 192.168.1.3 netmask 255.255.255.0 up
$ ip netns exec 44356 ifconfig vnic-1
vnic-1: flags=4163<UP,BROADCAST,RUNNING,MULTICAST>  mtu 1500
        inet 192.168.1.3  netmask 255.255.255.0  broadcast 192.168.1.255

$ ip netns exec 45091 ifconfig vnic-2 192.168.1.4 netmask 255.255.255.0 up
$ ip netns exec 45091 ifconfig vnic-2
vnic-2: flags=4163<UP,BROADCAST,RUNNING,MULTICAST>  mtu 1500
        inet 192.168.1.4  netmask 255.255.255.0  broadcast 192.168.1.255
check L3 connectivity:
$ docker exec -it ctn-1 sh

/ # ping -I vnic-1 192.168.1.4
PING 192.168.1.4 (192.168.1.4): 56 data bytes
64 bytes from 192.168.1.4: seq=0 ttl=64 time=0.489 ms
64 bytes from 192.168.1.4: seq=1 ttl=64 time=0.064 ms
this is equivalent to ip netns exec 44356 ping -I vnic-1 192.168.1.4.
3.2 Performance Test
Test our new NIC’s throughput with iperf3.
Install iperf3 on ctn-1 and ctn2:
/ # apk update && apk add iperf3
start iperf3 as server side in ctn-1:
/ # iperf3 -s
-----------------------------------------------------------
Server listening on 5201
-----------------------------------------------------------
Start iperf3 as client side in ctn-2, with default parameters:
/ # iperf3 -c 192.168.1.3
[  4] local 192.168.1.4 port 47957 connected to 192.168.1.3 port 5201
[ ID] Interval           Transfer     Bandwidth       Retr  Cwnd
[  4]   0.00-1.00   sec  4.72 GBytes  40.6 Gbits/sec    0    351 KBytes
[  4]   1.00-2.00   sec  5.01 GBytes  43.1 Gbits/sec    0    351 KBytes
[  4]   2.00-3.00   sec  4.95 GBytes  42.5 Gbits/sec    0    351 KBytes
[  4]   3.00-4.00   sec  4.73 GBytes  40.6 Gbits/sec    0    351 KBytes
[  4]   4.00-5.00   sec  4.84 GBytes  41.6 Gbits/sec    0    351 KBytes
[  4]   5.00-6.00   sec  4.93 GBytes  42.4 Gbits/sec    0    351 KBytes
[  4]   6.00-7.00   sec  4.92 GBytes  42.3 Gbits/sec    0    351 KBytes
[  4]   7.00-8.00   sec  4.95 GBytes  42.6 Gbits/sec    0    351 KBytes
[  4]   8.00-9.00   sec  4.92 GBytes  42.3 Gbits/sec    0    351 KBytes
[  4]   9.00-10.00  sec  4.94 GBytes  42.4 Gbits/sec    0    351 KBytes
- - - - - - - - - - - - - - - - - - - - - - - - -
[ ID] Interval           Transfer     Bandwidth       Retr
[  4]   0.00-10.00  sec  48.9 GBytes  42.0 Gbits/sec    0             sender
[  4]   0.00-10.00  sec  48.9 GBytes  42.0 Gbits/sec                  receiver
This simple test showed that our NIC achieved 40+Gbps bandwidth.
You could specify more parameters, e.g, use port 80 (-p), 100Mbps (-b),
10 seconds (-t), 100 concurrency (-P), UDP (-u):
# server
/ # iperf3 -s -p 80

# client
/ # iperf3 -c 192.168.1.3 -p 80 -b 100000000 -t 10 -P 100 -u
4 Different NIC Types
It is also possible to replace the OVS internal port with veth pair, tap
device, or other virtual network devices.
For example, to use veth pair:
$ add-nic-veth-pair.sh ctn-1 veth-1 vnic-1 br-int
$ add-nic-veth-pair.sh ctn-2 veth-2 vnic-2 br-int
instead of:
$ ./add-nic.sh ctn-1 vnic-1 br-int
$ ./add-nic.sh ctn-2 vnic-2 br-int
in Section 2.3, and all others steps remain the same.
5 Summary
In this post, we showed how to create virtual devices (OVS internal ports, veth pairs), and assign to docker containers as virtual NICs. We also showed how to verify the functionality, and how to measured the throughput perfomance of the virtual NICs.
6 Further Reading
Basically, what we have done in this article:
- create virtual devices: tap, veth pair, ovs port, etc
- attach device to container and bridge
- configure IP address for the device
- further settings: e.g. route table
are roughly the same steps that docker daemon does during a container
initialization: create a veth pair, attach one end to a linux bridge
(docker0) and another end to contaienr, and configure the device with an
internal IP (172.17.0.0/16).
Further, most of the network solutions for container orchestration platforms (K8S, Mesos, etc), e.g. Calico, Flannel, CNI, share much same steps as above.
Go ahead if you are interested!
References
- PDF: Linux Kernel Namespaces and cgroups
- Linux Foundation: iproute2
- ArthurChiao: OVS Deep Dive Series
- Linux Alpine
- How to find namespaces in a Linux system
- kernel.org: TUN/TAP
- OpenvSwitch (OVS)
- Man Page: veth
- iperf3
- Calico
- Flannel
- CNI